

The Finder in macOS is where you spend the most time when using your Mac. It is the most important tool for managing files and folders; it’s the basis for installing and launching apps; it’s where you can manage iPhones and iPads; and a lot more. It’s the foundation for the macOS interface and for using your Mac hardware.
Many Mac users have been using the Finder every day for decades, often without making full use of its capabilities or customizing it to suit their own needs. You should make the most of your UI experience. Here are ten tips on how to get more out of the Finder.
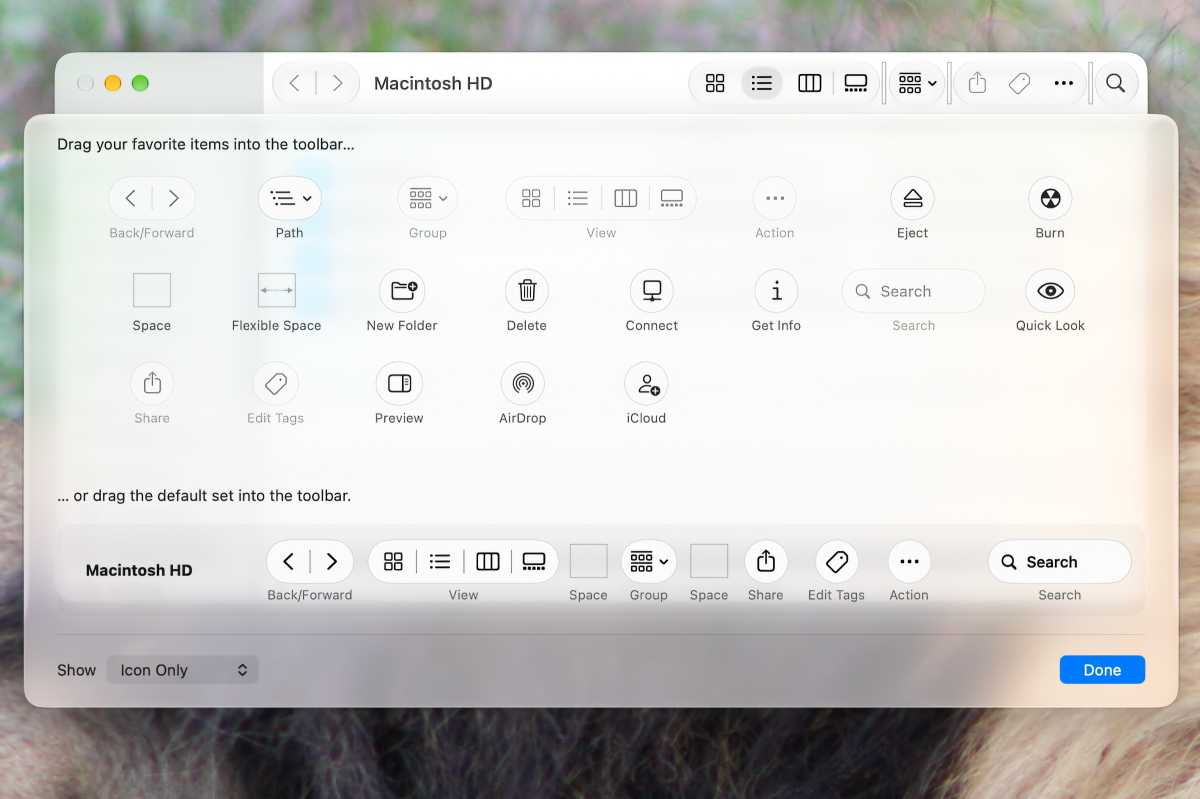
This is a very simple thing to do, but hardly anyone does. You should adjust the Finder toolbar to suit your own needs. To do this, open a Finder window and right-click on the toolbar. You’ll see the Customize Toolbar option in the context menu. Select it, and a window will appear with additional functions and tools. You can click and drag icons to where you want them in the toolbar.
The AirDrop icon, for example, is useful if you transfer files often: once it’s been added to the Finder, you simply select an item and send it straight away. The buttons for burning blank discs, ejecting media, and accessing servers can also be useful, depending on your needs.
Foundry
You can also easily change the order of the icons. Simply click on one while holding down the Command key. To remove it from the toolbar, simply drag it out.
Quick Actions are small tools that you can access via the context menu (the menu that appears when you right-click an item). They allow you to quickly convert PNG to JPEG or create a PDF, for example.
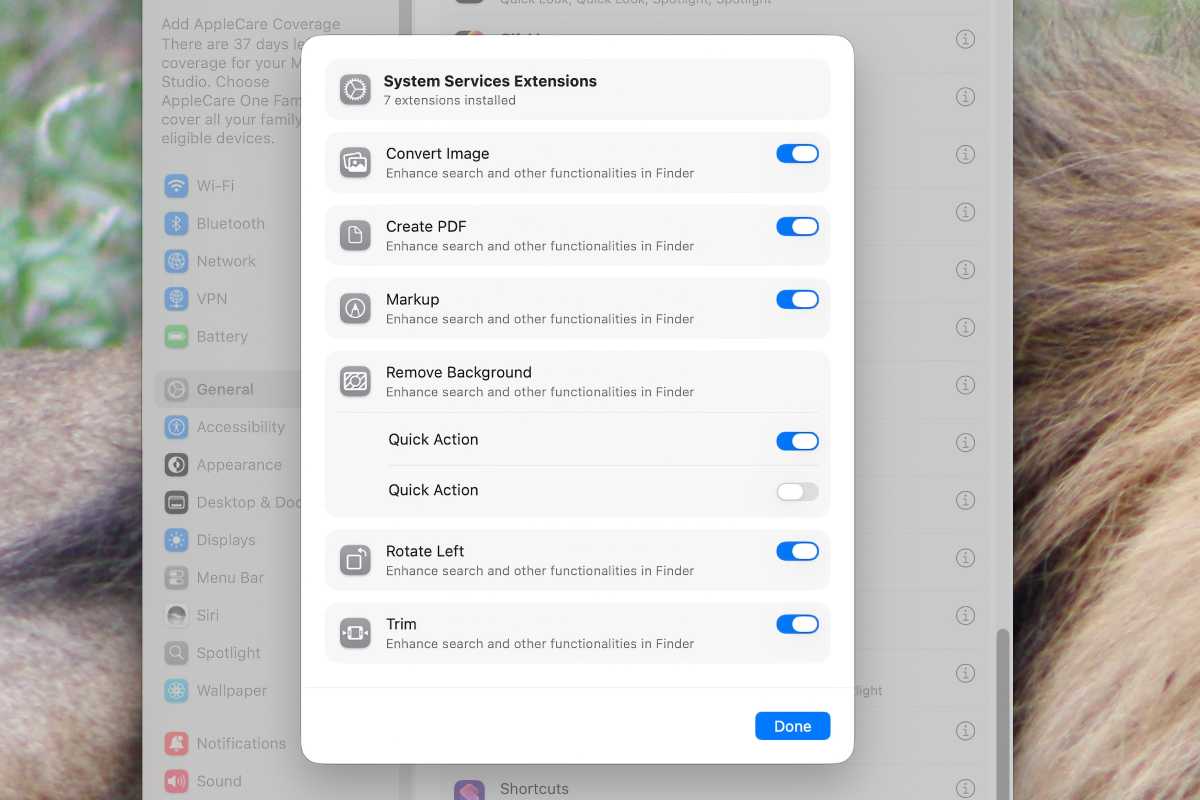
Six system services are provided by default, though the options available in the context menu depend on the selected file type. For example, if you right-click on a video, you can access a function to trim the video. This is quicker and easier than using QuickTime Player.
For photos, you can quickly convert them to other formats such as JPEG; you can combine several PDFs into a single PDF file using Create PDF; rotate a photo; and remove the background from a photo (though this doesn’t always work). For image files and PDFs, there’s also the option to add annotations. This opens a window with the tools familiar from Preview, allowing you to add lines, red arrows, and other annotations.
Foundry
You can enable and disable these useful extensions under General > Login Items & Extensions > System Services. To do this, click on the ‘i’ icon there.
There’s even a way to add your own Quick Actions: to do this, simply select ‘Quick Action’ as the file type in Automator and create a workflow – such as resizing a photo to a specific width. Once created, the workflow is immediately available via the context menu.
You don’t need to resort to a tool like Renamer to rename dozens of files or folders. The Finder also has a built-in function for renaming files. However, it’s somewhat hidden.
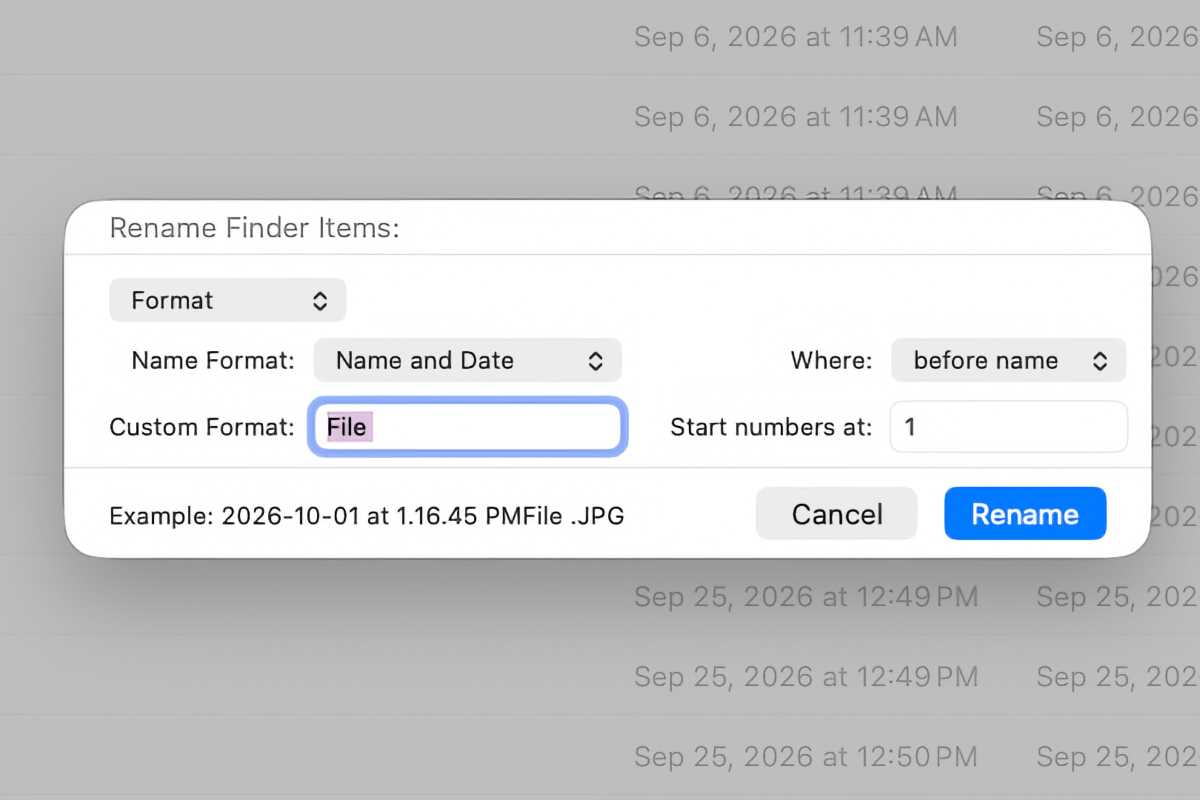
To access the feature, select multiple files and choose Rename from the context menu. If you selected just a single file, you can only change the name within the Finder; the file will be selected for you automatically. However, if you’ve selected multiple files, a separate new window opens with several options.
Foundry
Here you can choose from several renaming options; you can add text, replace text, or rename all files according to a new format. When replacing text, simply enter the original text and the new text in the two fields. When adding text, you can choose to add it at the beginning or the end, as a prefix or suffix.
The Format option is more complex, offering three choices: here you can choose between two numbering styles and adding the current date.
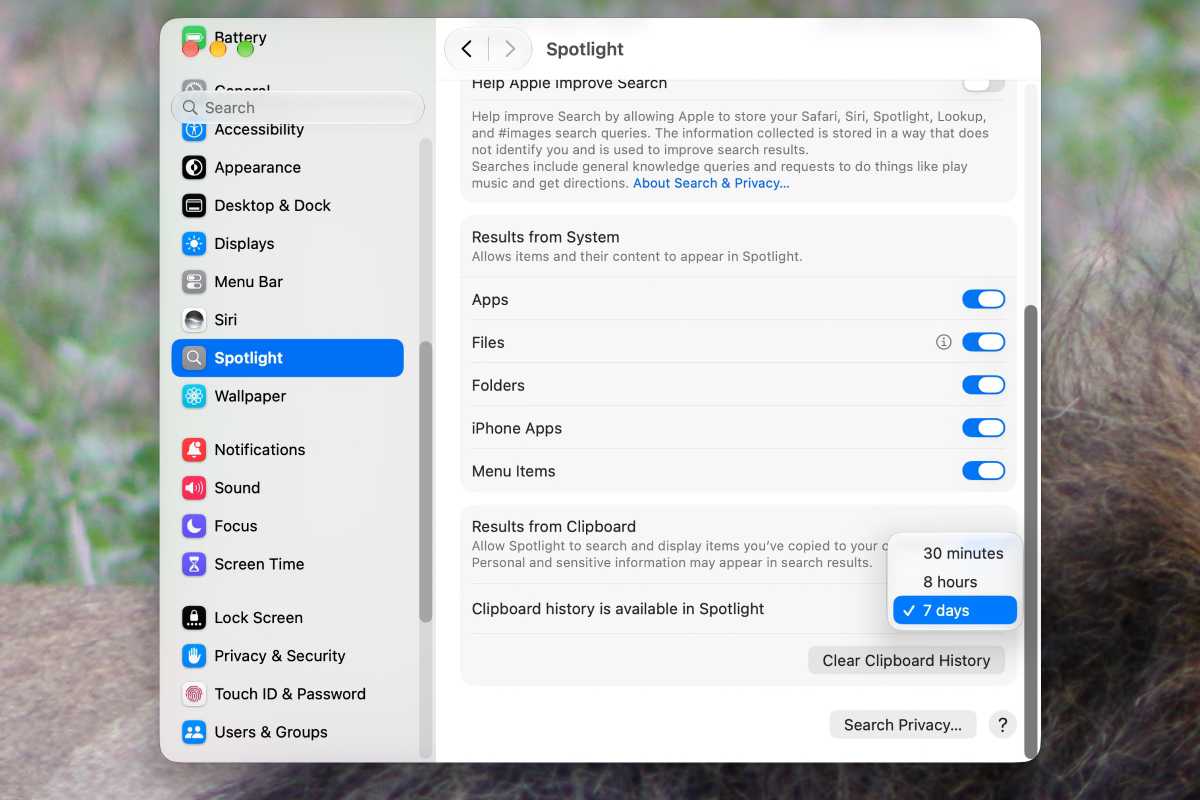
Starting with macOS Tahoe, old clipboard contents can be saved by the system on request and are searchable via Spotlight. You’ll need to enable this feature first via the Spotlight system setting. You can also select a retention period; options are 8 hours, 30 minutes, and 7 days.
Once enabled, you can enter a search term into Spotlight to search the clipboard text. Alongside other results, you’ll then see a list of previous clipboard entries, marked with two small boxes. You can also press Command+4 or select Clipboard after opening Spotlight.
You can valso iew the current clipboard select Edit > Show Clipboard from the menu bar in Finder, and the current clipboard will be displayed in a simple window.
Foundry
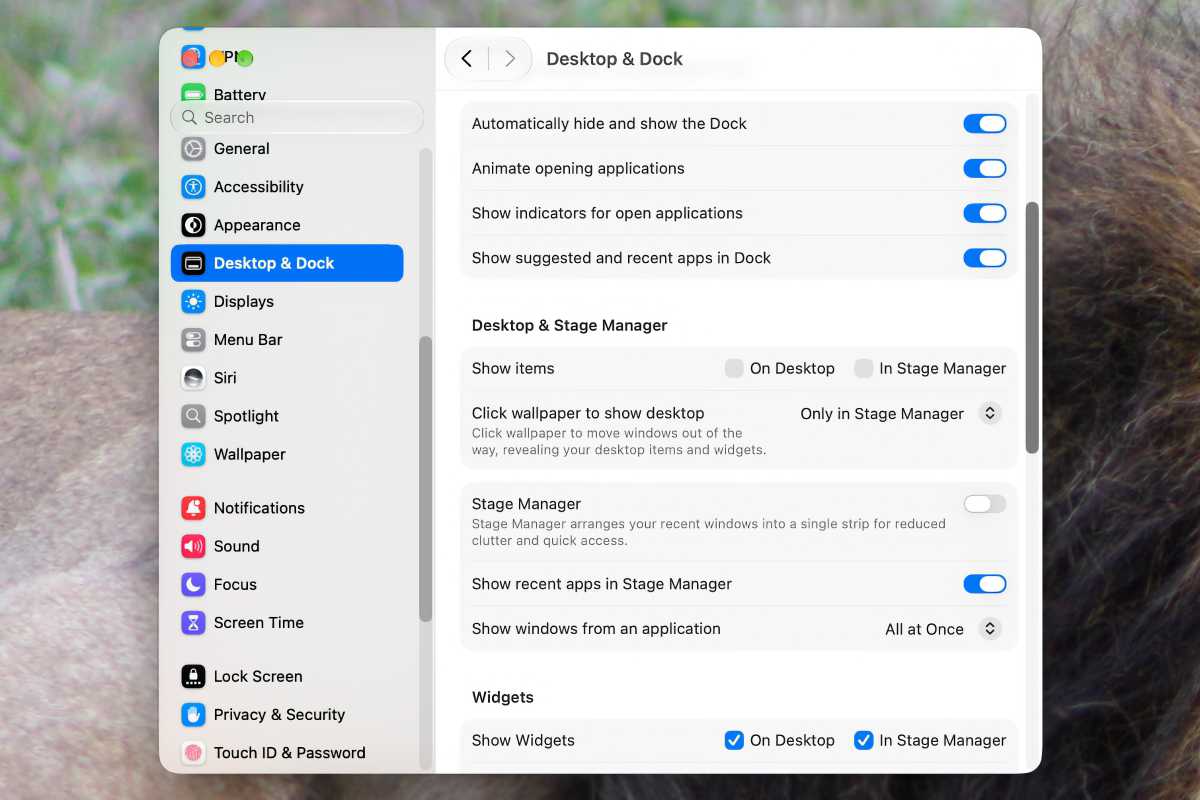
Apple now offers so many options for the Desktop and Dock that some people lose track of them all. For a long time, I overlooked the fact that the Desktop & Dock system setting can hide all items on the desktop completely.
To do this, go to the Desktop & Dock system settings and, under Show items, untick the box next to On the Desktop. You can later show all folders and files again using the same function.
Foundry
The Mac actually has countless invisible folders and files on your system. Most are used by the system and are best left hidden, otherwise, your folders can quickly become cluttered. Sometimes, invisible files are left behind when you uninstall an app or delete a file.
All you need to do is press Command+Shift+. to see invisible files. The first time you press the key combination, you see all hidden files and folders in the selected folder. Press it again, and they’ll disappear again.
You can make a file or folder invisible via Terminal: enter the command chflags hidden and add the path–drag and drop the file or folder into the Terminal window to do this.
The Finder is also responsible for allowing you to connect via the network: to other Macs, the company server or even a Fritzbox with NAS functionality. Available servers are often listed automatically in the Finder under Network. You can connect manually via Go > Connect to Server.
Even FTP is supported, but you can only download data. Uploads are not possible, and FTP servers using the SFTP or FTPS protocols are not supported. However, the FTP function is not always reliable and has often caused problems. It is not without reason that many experienced users prefer to use an FTP client such as Cyberduck for every FTP connection.
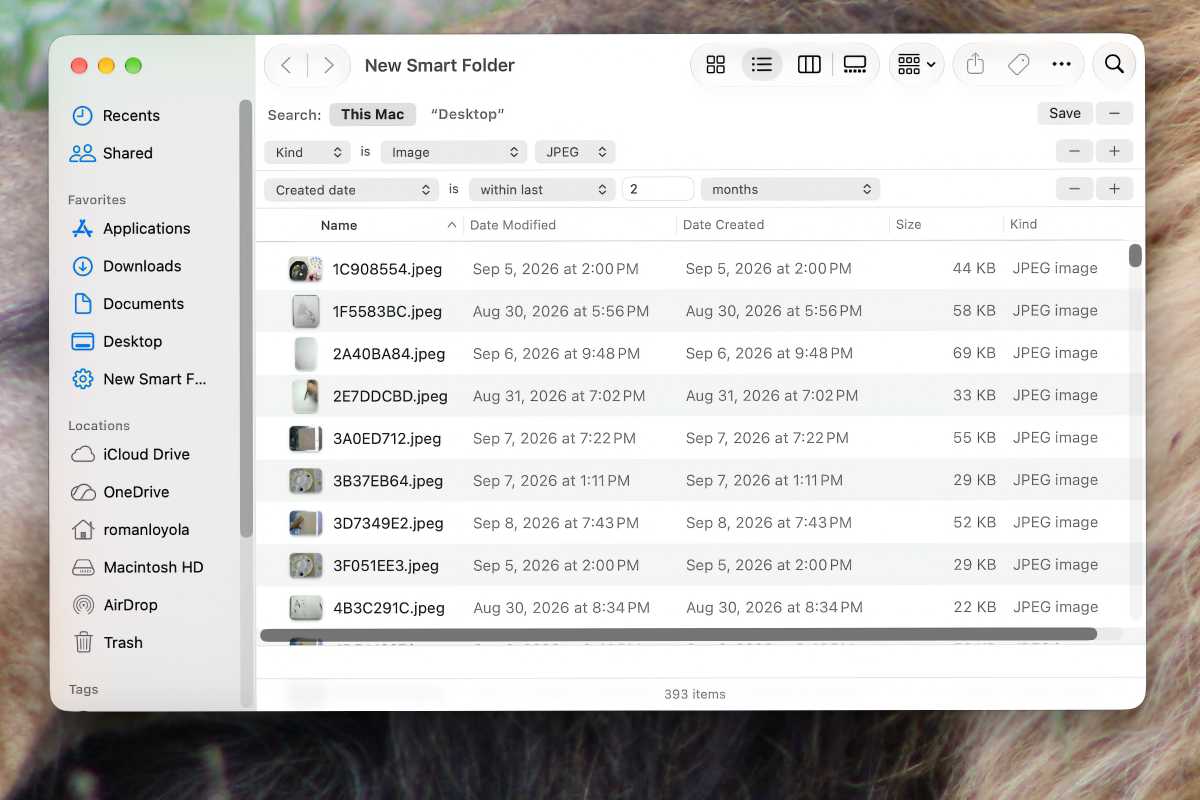
Smart Folders are very powerful, but unfortunately can be too fiddly. These ingenious folders are essentially saved search queries that update dynamically. You can save these folders once created and conveniently pin them to the sidebar. By default, however, the Finder links all search criteria using only simple AND conditions, as is familiar from Spotlight or the Google search engine.
Foundry
But the folder becomes truly smart with so-called Boolean operators. For example, when you’re looking for all image files but also all video files, or all files that are neither image files nor video files. (This might sound like a fiddly logic puzzle to you right now, but it can be very useful!)
Apple has hidden this option a little, presumably so as not to overwhelm beginners. First, create a smart folder as usual, for example, via File > New Smart Folder. Then click the + icon, and you can define the criteria for the items you want to appear in the folder. Click the + icon to add more definitions. Click the Save button to set the Smart Folder, and then when you open the folder, it will show all the items that fit the criteria you defined.


